7.7 Lab Experiments
IMPORTANT NOTE FOR FALL 2021 and FALL 2022: The videos and the two problems shown below were given as a lab assignment for ECE-361 during the pandemic of Fall 2020. During Fall 2021 and Fall 2022, the lab 4 assignment is CARDEMO#1 instead of these two problems. You will need to read the detailed specification for CARDEMO#1 that has been posted to the course Moodle site. The video for circuit 4.2, below, may be helpful in building the audio oscillator and the flashing LED for CARDEMO#1, but be aware of the following changes:
- Lab 3, which you previously completed, has the circuitry needed for detecting bright light (lab 3.1) and for turning on a motor using a low-side switch during the presence of bright light (lab 3.2). Use a TIP120 transistor for the low-side switch since your car motor will pull up to 2A of current.
- The video for circuit 4.2, below, uses +3V and -3V to power the relaxation oscillators. Use +6V and -6V instead. This will result in a louder audio oscillator and avoid the problems mentioned toward the end of the video.
- Use 2N3904 NPN low-side switch transistors in conjunction with your free-running audio oscillator and your blinking LED circuit as shown in the aforementioned lecture.
—————————————————————————
4.1 Build a circuit that causes an LED to glow using a 5 second turn-off delay using the circuit discussed on class #25. Instead of a push-button switch, you can simply momentarily connect two wires together. Nothing to submit for this circuit.
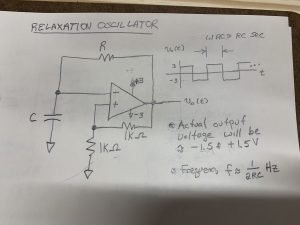
4.2 Build a circuit that emits an audible tone and causes a pair of LEDs to blink. The LEDs should blink on and off at a rate of “approximately 1 Hz (first LED on for 1/2 second, then the second LED is on for 1/2 second, then repeat) and the audio tone should be between approximately 200 Hz and 2 KHz. Submit a video demonstrating this functionality.


